When speaking with customers and colleagues, I often encounter questions and misconceptions about Defender for Servers in Microsoft Defender for Cloud. In this post, I explore these questions:
- Why should I care about Defender for Servers?
- How should I onboard my servers to Microsoft Defender for Servers?
- What happens under the hood when I onboard servers?
- How can I selectively deploy Defender for Servers (e.g., for a pilot)?
- How can I enforce and maintain full coverage of Defender for Servers?
- How can I monitor and query Defender for Servers coverage?
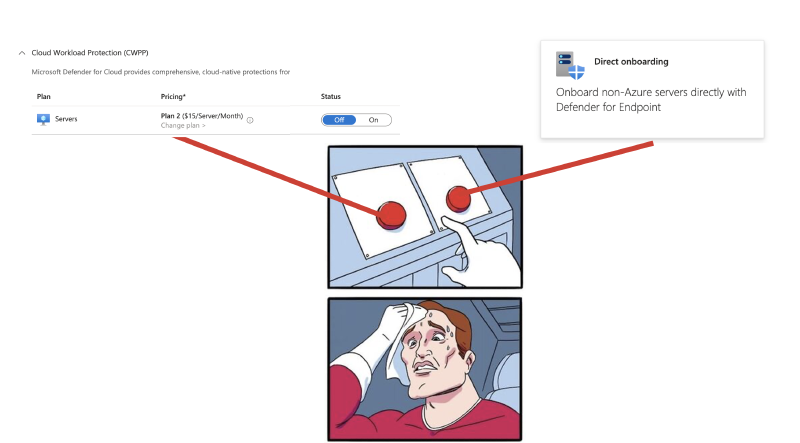
Defender for Servers Plans and Licensing#
While client devices in Microsoft Defender for Endpoint (MDE) are usually licensed through Microsoft 365 subscriptions such as Microsoft 365 E5, servers do not benefit from this licensing model. Instead, server licensing follows the Azure consumption model.
If you work with the Microsoft account team, you might also be able to obtain Microsoft Defender for Endpoint Server licenses. These are not consumption-based, so they do not require an Azure subscription and are usually part of enterprise agreements.
As part of the cloud workload protection platform (CWPP) capabilities in Defender for Cloud, Microsoft offers Defender for Servers in two tiers:
| Plan | Remarks |
|---|---|
| Defender for Servers Plan 1 | Plan 1 covers the essential MDE features. Although it includes a “1” in its name, it provides Defender for Endpoint Plan 2 capabilities, including EDR and advanced hunting.1 |
| Defender for Servers Plan 2 | Plan 2 adds more features, most notably premium Microsoft Defender Vulnerability Management capabilities 2 and a daily data ingestion allowance of 500 MB per server for eligible security data, including the SecurityEvent table. 3 Microsoft provides a comparison of the added features in the official documentation. 4 |
The data ingestion allowance can reduce costs if you ingest eligible security logs. It is calculated daily, not as a monthly credit. Compare the savings at your region’s applicable ingestion rate and billing model with the Plan 2 fee in the same currency. Under Microsoft Sentinel classic meters, the benefit applies to Log Analytics ingestion only; under simplified meters, it applies to Microsoft Sentinel ingestion. 3
For most organizations, Plan 1 is a good starting point.
The following illustration provides an easy-to-remember overview of the licensing:
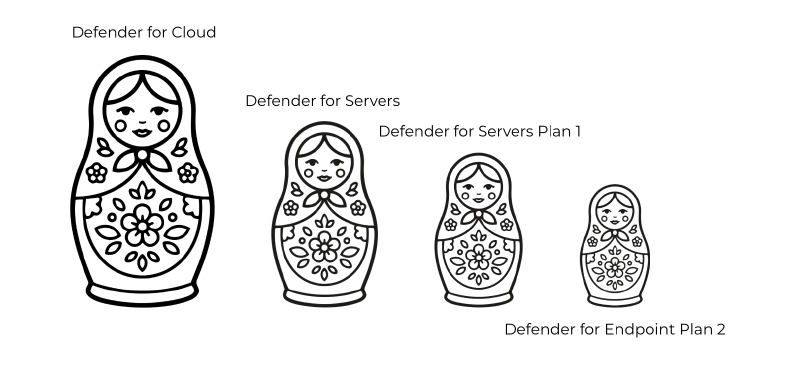
For another overview of Defender for Servers licensing, the M365 Maps project by Aaron Dinnage has you covered.
Onboarding Methods#
The onboarding method for Defender for Servers mainly depends on whether your servers are already represented in Azure, either as native Azure VMs or as Azure Arc-enabled servers.
If they are not, you can designate an Azure subscription in your environment as the billing subscription for direct onboarding. Ideally, this is a subscription without VM workloads, although Defender for Cloud deduplicates onboarded servers to avoid duplicate costs:
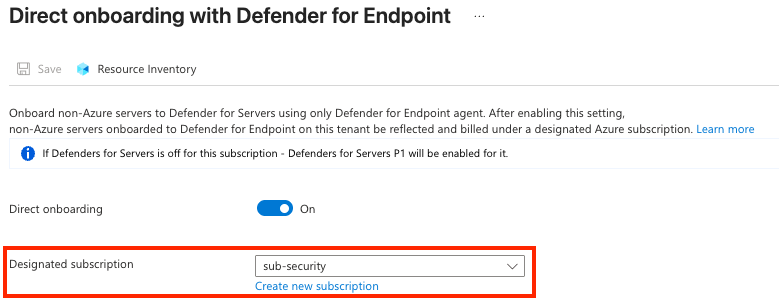
The costs for servers onboarded through onboarding scripts or the Defender deployment tool are then charged to that subscription. You still need to deploy the onboarding script and manage the unified solution for Windows Server 2012 R2 and 2016.
Direct onboarding provides Defender for Servers Plan 1 capabilities. You can also select Plan 2, but only its additional premium Defender Vulnerability Management capabilities apply in this scenario.
For Azure VMs or Azure Arc-enabled servers, you can use native onboarding through Defender for Cloud settings. The costs are charged to each server’s Azure subscription.
Defender for Cloud Settings (CWPP)#
In Defender for Cloud, we can configure the following settings for each subscription:
- The Defender for Servers plan (P1 or P2)
- Whether to enable Endpoint protection, which automatically deploys the
MDE.WindowsandMDE.Linuxextensions to your Azure VMs and Azure Arc-enabled servers - Whether to enable Defender for Servers for the subscription at all. If this toggle is not enabled, nothing will happen even if you configure the previous two settings.
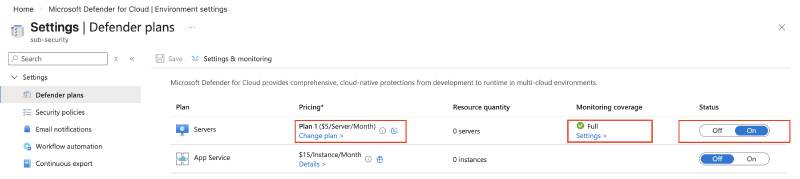
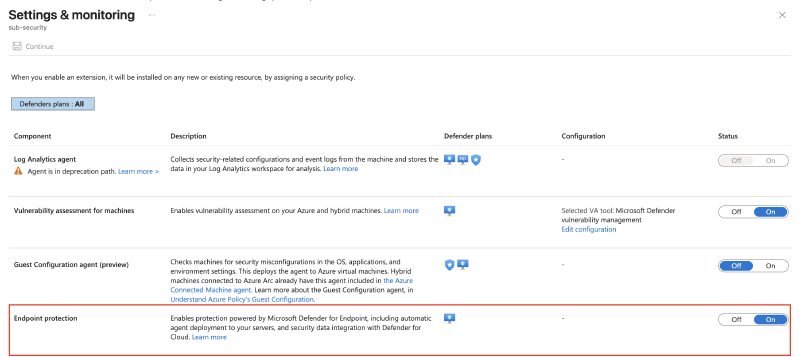
When conducting a pilot or migrating from another EDR solution, testing and coexistence are important. You do not want to flip the magic Servers status toggle to On, because this deploys Defender for Servers to every server in that subscription at once. If another EDR solution is already installed, this can cause “interesting” side effects.
For a controlled rollout, you can configure Defender for Servers at the resource level.
In larger environments, the Defender for Servers configuration must also cover all existing and new subscriptions. Incorporate it into the subscription vending process.
Configure the Defender for Servers CWPP settings through Azure Policy to ensure that all resources are protected, including those in newly added subscriptions. Examples are described in the Onboarding via Azure Policy section.
Preventing Resource-Level Overrides#
Although it is not visible in the portal, Defender for Cloud provides an enforce flag5 through Azure Resource Manager. Setting this flag prevents resource-specific overrides. By default, the flag is not set, so resource-specific overrides remain possible.
Leave enforcement disabled when you need resource-level overrides for a pilot or to downgrade selected servers from Plan 2 to Plan 1. Enabling it forces the subscription’s plan configuration on those resources, so the earlier downgrade approach no longer applies.
You can add or change the enforce flag with the following Azure Cloud Shell snippet or through Azure Policy, as described later in this post:
$a = Invoke-AzRestMethod -uri ('https://management.azure.com/subscriptions/{0}/providers/Microsoft.Security/pricings/virtualMachines?api-version=2025-10-01-preview' -f (Get-AzContext).Subscription.Id)
$content = $a.Content | ConvertFrom-Json
$content.properties | Add-Member -MemberType NoteProperty -Name enforce -Value true -Force
Invoke-AzRestMethod -uri ('https://management.azure.com/subscriptions/{0}/providers/Microsoft.Security/pricings/virtualMachines?api-version=2025-10-01-preview' -f (Get-AzContext).Subscription.Id) -Method PUT -Payload ($content | ConvertTo-Json -Depth 5)
If we now try to configure Plan 1 on a specific VM via the API, we receive an error, as expected:

$uri =  'https://management.azure.com/subscriptions/{subscriptionID}/RESOURCEGROUPS/{resourceGroup}/PROVIDERS/MICROSOFT.COMPUTE/VIRTUALMACHINES/{vmName}/providers/Microsoft.Security/pricings/virtualMachines?api-version=2024-01-01'

$payload =
@"
{
  "properties": {
    "pricingTier": "Standard",
    "subPlan": "P1"
  }
}
"@

Invoke-AzRestMethod -Uri $uri -Payload $payload -Method Put
Surfacing the Defender for Servers Configuration#
Subscriptions#
The Defender Plans Coverage Workbook shows you the Defender for Cloud and Defender for Servers coverage for each Azure subscription:
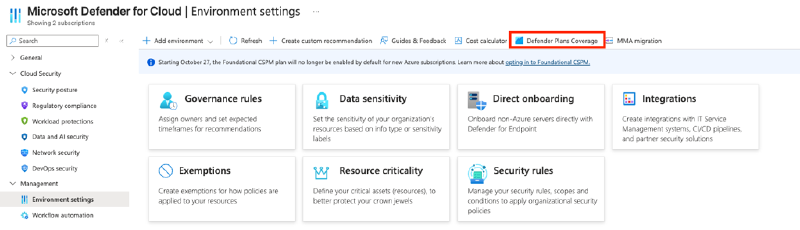
Unfortunately, resource-specific configurations are not displayed:
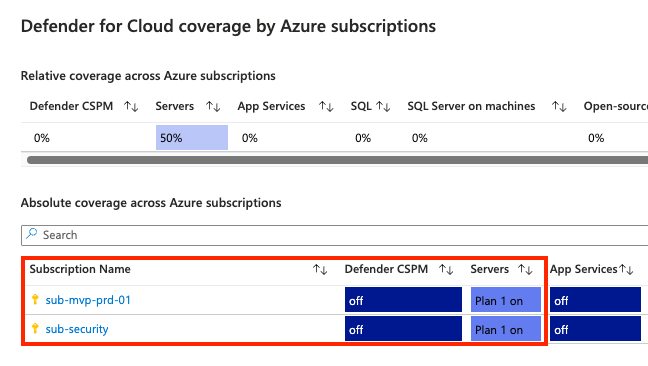
Resource-Specific Configuration#
To get resource-specific configurations, we can use Azure Resource Graph. The following query returns your Defender for Servers plan configuration in Defender for Cloud, including resource-specific overrides and their scope:

If you configured a subscription as the designated billing subscription for direct onboarding, the isMdeDesignatedSubscription column identifies it.
securityresources
| where type == "microsoft.security/pricings"
| where name == "VirtualMachines"
| extend MachineId = toupper(substring(id, 0, indexof(id, '/providers/Microsoft.Security/')))
| extend Scope = iif(MachineId has "SUBSCRIPTIONS", "SUBSCRIPTIONS", "")
| extend Scope = iif(MachineId has "RESOURCEGROUPS", "RESOURCEGROUPS", Scope)
| extend Scope = iif(MachineId has_any ("MACHINES","VIRTUALMACHINES" ), "VM", Scope)
| extend PricingTier = tostring(properties.pricingTier),
    SubPlan = tostring(properties.subPlan),
    EnablementTime = tostring(properties.enablementTime),
    Extensions = properties.extensions,
    isInherited = tobool(properties.inherited)
| mv-expand Extensions
// MdeDesignatedSubscription: The Subscription is declared as 'direct onboarding' subscription
| extend isMdeDesignatedSubscription = iif(Extensions.name == 'MdeDesignatedSubscription', tobool(Extensions.isEnabled), tobool('false'))
| summarize Extensions = make_set(Extensions) by
    Scope,
    ResourceId = MachineId,
    PricingTier,
    SubPlan,
    isInherited,
    isMdeDesignatedSubscription,
    EnablementTime
Onboarding via Azure Policy#
Granular Onboarding#
Microsoft provides sample Azure Policy definitions for configuring the Defender for Servers plan and its extensions.
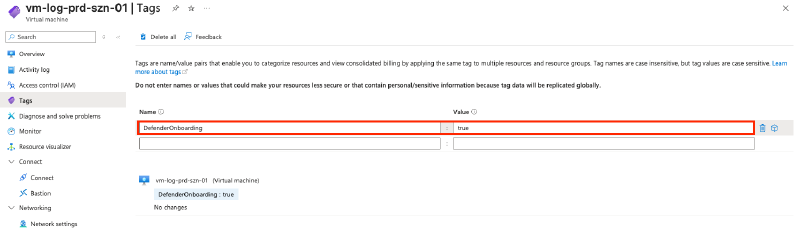
I modified the sample Azure Policy definitions to use a simple inclusion-tag approach. The policies apply only when a defined tag has the specified value on the Azure VM or Azure Arc-enabled server. This allows fine-grained pilot deployments and validation.
We can create customized, tag-based versions of the following built-in Azure Policy definitions to apply granular Defender for Servers plan configuration and onboarding:
- Configure Azure Defender for Servers to be enabled (P1 subplan) for all resources with the selected tag
- [Preview]: Deploy the Microsoft Defender for Endpoint agent on Linux hybrid machines
- [Preview]: Deploy the Microsoft Defender for Endpoint agent on Linux virtual machines
- [Preview]: Deploy Microsoft Defender for Endpoint agent on Windows Azure Arc machines
- [Preview]: Deploy the Microsoft Defender for Endpoint agent on Windows virtual machines
The next two snippets show the modifications, not complete deployable policy definitions. To create your own tag-based versions, copy the original definitions and merge the two parameters into each definition’s existing parameters block. Use inclusionTagName to specify the tag name and inclusionTagValue to specify its required value.
    "parameters": {
      "inclusionTagName": {
        "type": "String",
        "metadata": {
          "displayName": "Inclusion Tag Name",
          "description": "Name of the tag to use for including Arc machines in MDE onboarding (e.g., DefenderOnboarding)"
        },
        "defaultValue": "DefenderOnboarding"
      },
      "inclusionTagValue": {
        "type": "String",
        "metadata": {
          "displayName": "Inclusion Tag Value",
          "description": "Value of the tag that indicates the machine should be onboarded to MDE (e.g., true)"
        },
        "defaultValue": "true"
      }
    }
Then add the tag condition to the existing policyRule.if conditions, keeping the original conditions and then block:
 "policyRule": {
      "if": {
        "allOf": [
          {
            "field": "type",
            "in": [
              "Microsoft.Compute/virtualMachines",
              "Microsoft.HybridCompute/machines"
            ]
          },
          {
            "field": "[concat('tags[', parameters('inclusionTagName'), ']')]",
            "equals": "[parameters('inclusionTagValue')]"
          }
        ]
      }
 }
Once you have complete custom definitions, import them, create an initiative, and assign it at the management group level. I won’t go into the Azure Policy authoring process, as this is covered in the Microsoft Learn tutorial on creating policy definitions.
Example Policy: Windows Azure Arc-Enabled Servers
{
  "mode": "Indexed",
  "policyRule": {
    "if": {
      "allOf": [
        {
          "field": "type",
          "equals": "Microsoft.HybridCompute/machines"
        },
        {
          "field": "Microsoft.HybridCompute/machines/osName",
          "like": "windows*"
        },
        {
          "field": "[concat('tags[', parameters('inclusionTagName'), ']')]",
          "equals": "[parameters('inclusionTagValue')]"
        },
        {
          "anyOf": [
            {
              "field": "Microsoft.HybridCompute/machines/osSku",
              "contains": "2012"
            },
            {
              "field": "Microsoft.HybridCompute/machines/osSku",
              "contains": "2016"
            },
            {
              "field": "Microsoft.HybridCompute/machines/osSku",
              "contains": "2019"
            },
            {
              "field": "Microsoft.HybridCompute/machines/osSku",
              "contains": "2022"
            },
            {
              "field": "Microsoft.HybridCompute/machines/osSku",
              "contains": "2025"
            },
            {
              "field": "Microsoft.HybridCompute/machines/osSku",
              "equals": "Windows 10 Enterprise multi-session"
            },
            {
              "field": "Microsoft.HybridCompute/machines/osSku",
              "equals": "Windows 10 Enterprise for Virtual Desktops"
            }
          ]
        }
      ]
    },
    "then": {
      "effect": "[parameters('effect')]",
      "details": {
        "roleDefinitionIds": [
          "/providers/microsoft.authorization/roleDefinitions/b24988ac-6180-42a0-ab88-20f7382dd24c"
        ],
        "type": "Microsoft.HybridCompute/machines/extensions",
        "name": "MDE.Windows",
        "existenceCondition": {
          "allOf": [
            {
              "field": "Microsoft.HybridCompute/machines/extensions/publisher",
              "equals": "Microsoft.Azure.AzureDefenderForServers"
            },
            {
              "field": "Microsoft.HybridCompute/machines/extensions/type",
              "equals": "MDE.Windows"
            },
            {
              "field": "Microsoft.HybridCompute/machines/extensions/provisioningState",
              "equals": "Succeeded"
            }
          ]
        },
        "deployment": {
          "properties": {
            "mode": "incremental",
            "parameters": {
              "vmName": {
                "value": "[field('name')]"
              },
              "location": {
                "value": "[field('location')]"
              },
              "azureResourceId": {
                "value": "[concat('/subscriptions/', subscription().subscriptionId, '/resourceGroups/', resourceGroup().name, '/providers/Microsoft.HybridCompute/machines/',field('name'))]"
              }
            },
            "template": {
              "$schema": "https://schema.management.azure.com/schemas/2015-01-01/deploymentTemplate.json#",
              "contentVersion": "1.0.0.0",
              "parameters": {
                "vmName": {
                  "type": "string"
                },
                "location": {
                  "type": "string"
                },
                "azureResourceId": {
                  "type": "string"
                }
              },
              "resources": [
                {
                  "apiVersion": "2019-12-12",
                  "name": "[concat(parameters('vmName'), '/MDE.Windows')]",
                  "type": "Microsoft.HybridCompute/machines/extensions",
                  "location": "[parameters('location')]",
                  "properties": {
                    "autoUpgradeMinorVersion": true,
                    "publisher": "Microsoft.Azure.AzureDefenderForServers",
                    "type": "MDE.Windows",
                    "typeHandlerVersion": "1.0",
                    "settings": {
                      "azureResourceId": "[parameters('azureResourceId')]",
                      "vNextEnabled": "true",
                      "installedBy": "Policy"
                    },
                    "protectedSettings": {
                      "defenderForEndpointOnboardingScript": "[reference(subscriptionResourceId('Microsoft.Security/mdeOnboardings', 'Windows'), '2021-10-01-preview', 'full').properties.onboardingPackageWindows]"
                    }
                  }
                }
              ]
            }
          }
        }
      }
    }
  },
  "parameters": {
    "effect": {
      "type": "String",
      "metadata": {
        "displayName": "Effect",
        "description": "Enable or disable the execution of the policy"
      },
      "allowedValues": [
        "DeployIfNotExists",
        "AuditIfNotExists",
        "Disabled"
      ],
      "defaultValue": "DeployIfNotExists"
    },
    "inclusionTagName": {
      "type": "String",
      "metadata": {
        "displayName": "Inclusion Tag Name",
        "description": "Name of the tag to use for including Arc machines in MDE onboarding (e.g., DefenderOnboarding)"
      },
      "defaultValue": "DefenderOnboarding"
    },
    "inclusionTagValue": {
      "type": "String",
      "metadata": {
        "displayName": "Inclusion Tag Value",
        "description": "Value of the tag that indicates the machine should be onboarded to MDE (e.g., true)"
      },
      "defaultValue": "true"
    }
  }
}
You can now apply the inclusion tag to the pilot servers:
Afterwards, wait a couple of cloud minutes for Azure to recognize the non-compliance, or manually trigger a policy scan with az policy state trigger-scan. Then remediate the policy deployment:
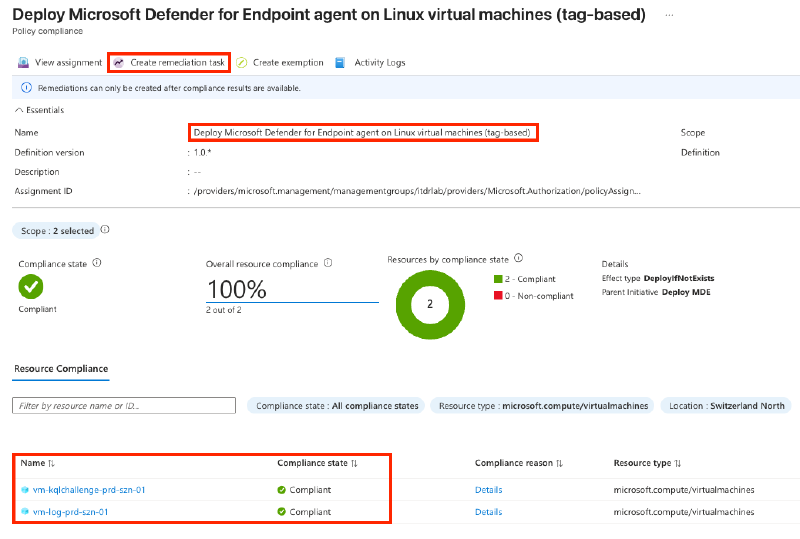
… and the extension and Defender for Servers plan configuration will be deployed accordingly.
Full-Scale Onboarding#
You can use the Configure Microsoft Defender for Servers plan (P1 or P2) built-in Azure Policy definition to roll out the configuration to all subscriptions. Ideally, assign this definition at the corporate management group level to ensure that future subscriptions also get Defender for Servers coverage automatically.
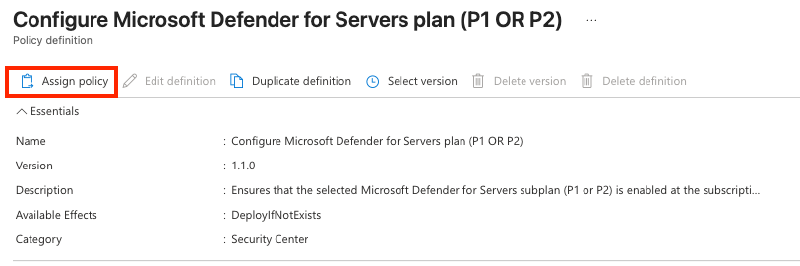
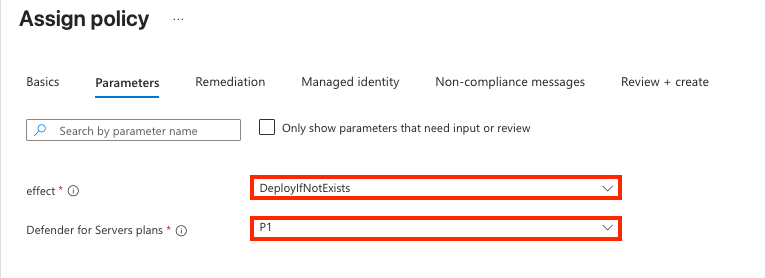
Select the appropriate Defender for Servers plan:
You can then complete the policy assignment and create a remediation task.
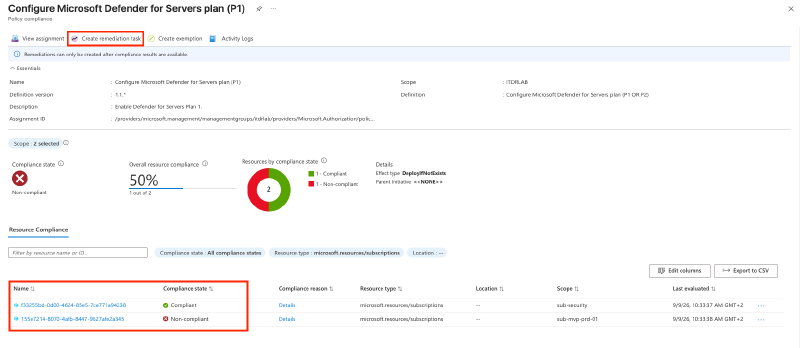
From now on, the policy covers all existing and future subscriptions under the targeted management group.
Azure and Azure Arc Onboarding Flow#
Of course, I wanted to understand what happens when you flip the magic Defender for Cloud toggles or use Azure Policy.
The MDE.Windows and MDE.Linux extensions receive a defenderForEndpointOnboardingScript parameter containing the onboarding package with tenant-specific information. You can see this in an Azure Policy definition:
"protectedSettings": {
    "defenderForEndpointOnboardingScript": "[reference(subscriptionResourceId('Microsoft.Security/mdeOnboardings', 'Windows'), '2021-10-01-preview', 'full').properties.onboardingPackageWindows]"
}
We can also call the Azure Resource Manager API endpoint for the mdeOnboardings resource directly:6
GET https://management.azure.com/subscriptions/{subscriptionId}/providers/Microsoft.Security/mdeOnboardings?api-version=2021-10-01-preview
The API returns several Base64-encoded onboarding packages in the resource properties:
onboardingPackageLinuxonboardingPackageWindowsCMonboardingPackageWindows
It also provides a verification model for each onboarding package:
linuxVerificationModelwindowsCMVerificationModelwindowsVerificationModel
The verification model contains integrity information, such as the certificate, its chain, and a signature.
The mdeOnboardings endpoint can also be queried with PowerShell:
$mdeOnboardings = Invoke-AzRestMethod -Uri ('https://management.azure.com/subscriptions/{0}/providers/Microsoft.Security/mdeOnboardings?api-version=2021-10-01-preview' -f (Get-AzContext).Subscription.Id )
$defaultMdeOnboarding = $mdeOnboardings.content | ConvertFrom-Json | Select-Object -ExpandProperty value
$onboardingPackageWindows = [System.Text.Encoding]::UTF8.GetString([System.Convert]::FromBase64String($defaultMdeOnboarding.properties.onboardingPackageWindows))
$onboardingPackageLinux = [System.Text.Encoding]::UTF8.GetString([System.Convert]::FromBase64String($defaultMdeOnboarding.properties.onboardingPackageLinux))Windows#
The MDE.Windows extension contains all the logic for MDE onboarding. The artifacts are visible on disk and reveal some of the underlying components:
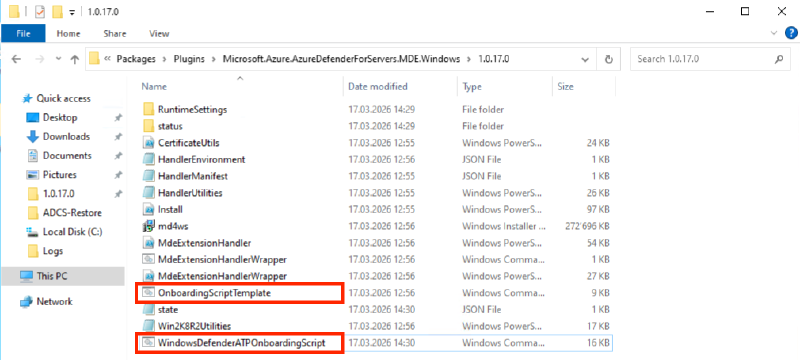
If you are familiar with MDE on Windows Server 2012 R2 and 2016, you might also recognize md4ws.msi, which contains the unified solution for down-level servers.
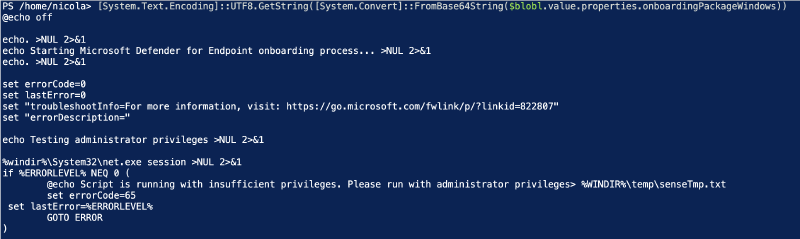
Decoding the Base64-encoded onboarding package reveals the familiar CMD-based onboarding script:
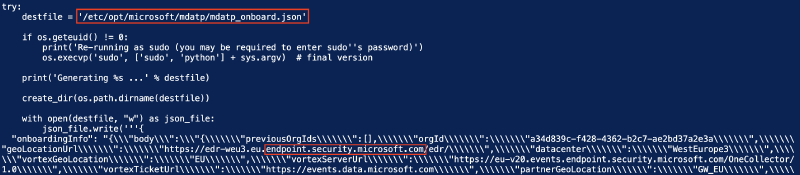
We can also find our MDE organization ID and connectivity URLs. If you see endpoint.security.microsoft.com, it generally indicates streamlined connectivity:

After acquiring the onboarding information through the API, WindowsDefenderATPOnboardingScript.cmd and the MDE extension’s PowerShell wrappers are ready to perform the standard MDE onboarding activities.
Linux#
On Linux servers, the MDE.Linux extension is staged under /var/lib/waagent/Microsoft.Azure.AzureDefenderForServers.MDE.Linux-*. This directory includes the mde_installer.sh script, which performs the onboarding.
The Linux MDE onboarding package served by the API contains a Python script that generates /etc/opt/microsoft/mdatp/mdatp_onboard.json. The mde_installer.sh script then picks up this file.
Monitoring Extension Installation#
The following KQL query shows the installation status of the MDE.Windows and MDE.Linux VM extensions for each Azure VM or Azure Arc-enabled server:

Resources
| where type in~ ('microsoft.hybridcompute/machines', 'microsoft.compute/virtualmachines')
| project MachineId = tolower(id),
    ComputerName = tostring(properties.osProfile.computerName),
    OSName = tostring(properties.osName)
| join kind=leftouter(
    Resources
    | where type in ('microsoft.hybridcompute/machines/extensions', 'microsoft.compute/virtualmachines/extensions')
    | extend MachineId = tolower(substring(id, 0, indexof(id, '/extensions'))),
        ExtensionName = name,
        ProvisioningState = tostring(properties.provisioningState)
    | where ProvisioningState =~ 'Succeeded'
    )
    on MachineId
| summarize Extensions = make_set(ExtensionName) by ComputerName, MachineId
| extend MDEExtensionInstalled = Extensions has_any ('MDE.Windows', 'MDE.Linux')
// Uncomment to find servers without the extension
//| where not(MDEExtensionInstalled)
A Note on Streamlined Connectivity#
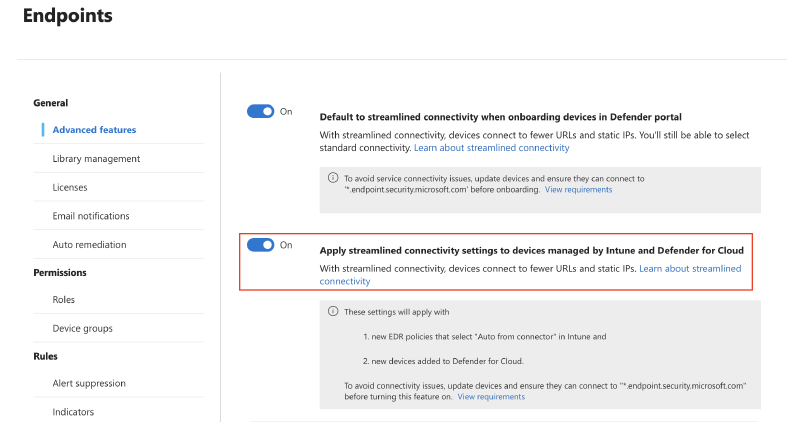
To take advantage of streamlined connectivity, you need to enable the following toggle in the MDE configuration. Otherwise, the API returns the classic URLs:
Alternatively, you can check ConnectivityType in Advanced Hunting:
DeviceInfo
| summarize arg_max(Timestamp, *) by DeviceId
| project DeviceName, ConnectivityType, TimestampRecap#
Defender for Servers brings together server licensing, plan configuration, and MDE onboarding. Ideally, use Azure Policy to maintain coverage: tag-based policies for a controlled pilot, then management group assignments for a broader rollout across subscriptions.
The same subscription-level Azure Policy approach can be used to deploy other Microsoft Defender for Cloud workload protection plans and Defender Cloud Security Posture Management (CSPM) across Azure subscriptions.
Microsoft Learn - Defender for Servers - Plan protection features (https://learn.microsoft.com/en-us/azure/defender-for-cloud/defender-for-servers-overview) ↩︎
Microsoft Learn - Compare Microsoft Defender Vulnerability Management plans and capabilities (https://learn.microsoft.com/en-us/defender-vulnerability-management/defender-vulnerability-management-capabilities) ↩︎
Microsoft Learn - Defender for Cloud - Use the data ingestion benefit (https://learn.microsoft.com/en-us/azure/defender-for-cloud/data-ingestion-benefit#prerequisites) ↩︎ ↩︎
Microsoft Learn - Defender for Servers - Plan protection features (https://learn.microsoft.com/en-us/azure/defender-for-cloud/defender-for-servers-overview#plan-protection-features) ↩︎
Microsoft Learn - Microsoft.Security pricings (https://learn.microsoft.com/en-us/azure/templates/microsoft.security/pricings?pivots=deployment-language-bicep#pricingproperties) ↩︎
Microsoft Learn - Mde Onboardings (https://learn.microsoft.com/en-us/rest/api/defenderforcloud-composite/mde-onboardings/list?view=rest-defenderforcloud-composite-preview&tabs=HTTP): ↩︎